Showing posts with label Clothing. Show all posts

Simple Yet Swanky!

0
COMMENTS


Simple Yet Swanky

So first let me start by apologizing for my lack of posts lately!! Ah! Sorry!! My photography business had picked up since the start of the year and that with a lot of other things has kept me very busy! So here we are.. a sweet little simple yet swanky way to make one of those vintage looking cocktail hats.. What is a cocktail hat you ask?? Cocktail hats are small, extravagant hats for women. They are usually worn as evening wear and are intended as a alternative to the large brimmed women's hats. These hats are often decorated with beads, jewels and/or feathers. Veils are also a common feature of cocktail hats. ...Why would you or i want to make one? Well i needed one for a friends photography class assignment.. and you might want to make one for a tea party or maybe for a little girl to play dress up.. or maybe just because.. anyway, here is how it is done...

Things you will need-

A straw hat (Goodwill is a great place to find one)
Some Scissors
An onion sack/bag or any other kind of mess type sack
Some paint
and a glue gun

I first started by removing the embellishments off of the hat, if you have any and they go with your design feel free to leave them. I needed a plain hat though :/

Then I cut all around the brim of the hat making sure not to cut into the sew edge of the top piece so it would stay together..


Next I cut one end of the onion sack open and then glued the tied end to the inside center of the hat.. if this seems confusing sorry, just take a few minutes to think about it and you will figure it out..

After the glue has dried you are ready to paint.. choose any color you like just make sure you get a flat paint because i had a ton of problems with the satin.. Also, to make it easier to paint i put my hand in a walmart sack and then placed the hat over it so i would avoid overspray but still be able to freely turn the hat to get coverage from all angles.

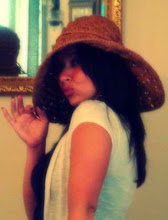
Let your paint dry, add a few more coats if needed, and there you have it.. a cute little cocktail hat :)

Not So Tragic T-Shirts!!!

0
COMMENTS
       Let me start by apologizing for my lack of posting lately! Since my baby girl has started school my schedule has changed and well, I’ve just not had the time. But, after some recent inspiration I am back in the game Woot! Here we go.. So. I recently went out to see a local band called Bad Country (great show might I add, check them out on Facebook!) and there was a waitress wearing the cutest little t-shirt..it had an amazing ripped/stretched/laddered pattern down the back and wow did she rock it! I decided then that I would have to *try* to create my own! I remembered watching an episode of Rock of Love with Bret Michaels where he took his lovely ladies out for a date to a celebrity t-shirt cutter/artist? I guess you would call him? So I headed straight for the ole trusty Google page and did a little research and here is what I came up with! Check out the video of Adam Saaks below, his work is ahhhhmazing...


Now you can Click Here to see my Adam Saaks inspired T-Shirt Reconstruction!

Fun For School!!

0
COMMENTS
My daughter, Kadelyn, started kindergarten this year and the past two weeks they were studying colors. So, each day they had to wear a different color..Well, some of those colors we did not have in her wardrobe so I decided to do a fun little project that would be hands on and safe for her to do!! So here we go!!!

This isnt a DIY project, just something fun for us to do but feel free to try it yourself with your kids! All we needed were some bowsl, food coloring, vinegar, rubber bands and some plain white t's :)


All we did was tie up the shirts in different ways using the rubber bands, added vinegar to the food coloring and then we dipped, dabbed, dripped and dropped color all over them.


After we finished with our designs we let them dry for the night, and the next day we rinsed them in cold water. I read that adding salt to the water helps keep the color, but I am not sure if that actually helped or not??

They turned out really well.. some of the color does fade after washing but it is still a nice project with the kids!! :)

Blue Jean Dream!

0
COMMENTS
So, I have been in a long drawn out process of down sizing my closet! Blah! Anyway, I came across an old blue jean skirt that had a rip up the front & was about 4? sizes too big.. After trying to decide to fix, toss or scrap it out for parts :) I came up with the idea of making an apron.. I am a painter myself and am always making a mess on the front of my jeans so I could use a few aprons!! This would also be a cute idea to use while cooking and also it could be a hair stylists' HOT new (functional) accesory...Click here to see how it's done!