
The purpose of my DIYs are not to help you create one specific item with one specific use, but to inspire you to try something new and make something old come back to life.
{Clothesline Wall Decor}
(My Inspiration Wall)
So, my poor pathetic wall needed some love from lil ole Stevi.. This is what I came up with! A little clothesline thingie lol
So first, here is what your are going to need...


Some heavy duty string/twine/ribbon..what ever :)
Clothespins
A hammer and some small nails
Paint & a paint brush- if ya want..
and things that inspire you!! This could be pictures, newspaper clippings, pages from a magazine, concert tickets etc..
So what we are going to do is tack our rope (mine is actually called Natural Sisal- that i picked up at Hobby Lobby) to the wall..This is pretty simple.. dont cut the rope, just let the roll hang so you can get your measurements right. You want to hang it kind of messy from side to side like this..

Then cut the excess off, i left a little to add something extra to the bottom..
I chose to paint my clothespins to bring a little more color into my room.. but you dont have to.. you can also use the older style clothespins too but i thought these better suit my needs :)


Now all you need to do is gather all of your "inspiration" and attach it to the ropes. Pretty simple right? But i think it makes a big statement in a room :) You could also use this concept to hang poetry in a library room, photos in a living room, recipes in a kitchen, music notes from a love song in your bedroom, or even possibly comic strips in the bathroom maybe? It is super cheap and super cute!!!
What do you think??


{T-Shirt Recon!}
(Adam Saaks Inspired)
This probably isnt the most detailed DIY I’ve posted but I more wanted to get the idea out there and let you all have fun with some old shirts of your own!!
Anyway, what you will need..
- Large Sharp Scissors
- One of *More* Old T-Shirts (Cotton)
- A Tad Bit of Creativity

First lay your shirt out flat and smooth out all wrinkles..


I chose to cut my neck line, you can be as creative with this as you'd like, cut a little cut a lot, just remember you can always cut more but once its gone you cant get it back!!
After you have your neckline and sleeves the way you would like them, fold your shirt in half and again smooth out any wrinkles.. I am going to make my design go along the line of the bottle on this shirt so I will fold it in that section of the shirt. If you are doing the back of your shirt just find the center by the neckline or even the tag and fold it in half, making sure you are NOT cutting through both front and back of the shirt. Sorry if that sounds confusing!!

Next you are going to cut small strips on your fold line. These strips can be as small or big as you would like :) Remember this is your shirt and your style so there is no wrong way to do it these.


Here is what your shirt should now look like. Notice I only cut through my fold on the back of the shirt, I did NOT cut through the front also.

What we will do is START with the SECOND strip.

We take the #2 strip and run it UNDER the #1 strip then OVER it, and I kind of push the #1 strip down towards the shirt out of my way. Next you will take the #3
 strip and run it UNDER then OVER the #2 strip then push the #2 strip out of the way and then run #4 under and over #3 and so on until you have made it to the bottom.
 Once you get to the bottom you need to tie off the strips to do this i usually cut my LAST strip in the middle and then cut those two ends in half and double knot them around my last loop.

There ya have it! I hope this isnt too confusing!! It took me a little bit of research to get the method down at first but once you play around with the idea for a while you learn more ways and places on a shirt that you can do this :) Enjoy! Feedback is also welcome so leave me a COMMENT!!!

I wanted to make this shirt tighter so I actually cut my strips then double knotted them back together befor I started the laddering process.

For this shirt, I did the laddering process twice to make two lines down the back :)
{Cork Board to Jewelry Holder}
What you will need-

A Cork/Peg Board
Metal Bottle Caps
Push Pins
Hot Glue Gun & Sticks
Paint (I used acrylic)
Ribbon (Any type or color)
& Pant Brushes
First, remove all of your old items from the cork board.
Now that you have a nice clean surface, its time to paint.. I am choosing to paint my border and the inside cork.. You can paint these items what ever colors you would like!
Now we are going to let that dry and start working on our push pins and bottle caps.. What you need to do is dab a tiny bit of hot glue on the inside of the bottle caps then attach your push pins.. (You don’t have to do this step but they will make some more creative push pins for your new Jewelry Holder!!)

After the glue has dried you can stick those newly made pins into your DRY cork board and paint them.. You can paint them a solid color, add dots or stripes... remember, the possibilities are unlimited.

Now its time to go back to the board.. You can add ribbon, flowers, pictures..what ever you would like to decorate it :) You can attach these items either with the glue gun or smaller more decorative push pins..


After everything is dry its time to add your necklaces!! And that’s it!
{Drink Up!!}
Mini Bottle Tree
What you will need...
- Sticks/Tree Branch
- Glass Bottles
- Paint (I used Acrylic)
- Zip Ties (Maybe)
First I had to hunt down a nice tree branch to use as the base of my bottle tree
They neighbors had a tree down so I decided to swipe a branch from it..shhhh!!


 Make sure the branch you use is thick and sturdy enough to hold your bottles because the tree will be top heavy and the bottles can weigh down skinny branches...
Next you need to remove all of the leaves from the branch and trim the smaller branches to a length that will have just enough of a stub to hold your bottle..
I couldn’t find a branch sturdy enough and with a branch pattern? that I liked so I took too and zip tied them together..(this is where you may or may not use the zip ties)
You can either leave the branch its natural wood color or paint it.. I chose to paint mine a deep red/maroon color to make my bright bottles pop..Let it dry and lets get started on the bottles!!!


I collected my old (70’s 80’s) glass bottles from around my grandparents farm.. I found an array of green and clear bottles!! You can use any type of glass bottles (Snapple, Coke, or even Beer or Wine Bottles), I just liked the idea of mine being older :) and smaller..
So, we need to wash those bottles now and remove the labels.. simple enough right? Soap and water works fine just make sure you use a tiny drop or you will be fighting soap bubbles for an hour haha


I drained the excess water out of my bottles but didnt worry too much about them being completly dry because I liked the effect the water would make with the paint..
Next all I did was drip different colors of paint into each bottle until I had the look i desired..
You can mix colors add glitter etc... If you think it will look good..Just go for it!!

Now we let the paint in out bottles dry and go back to work on our tree branch..
You need to dig a hole at least 6 inches deep to make sure your branch will be stable... (After digging once and “planting” my tree it fell over after I put my bottles on so I had to redo my hole lol) Like I said it is going to be top heavy so you want a long branch deep in the ground..
Now after you have it “planted” where you want it... add the dry bottles to your branch stubs...I put larger bottles towards the bottom and my smaller ones towards the top.. There ya go!! Your very own version of a Mini Bottle Tree!!


{Blue Jean Dream}

Supplies:
Old jeans, skirt, or shorts with pockets (for storage) & belt loops (for ribbon)
Ribbon (put through belt loop to tie)
Accessories to decorate...
Now Do It Yourself!
First you need to cut along the sides of the skirt...You can use either the front or back half of the skirt.. or even both and make one for a friend.. as long as there are pockets you're in! But if not, hang on to your extra material, ya never know when you could use it!

Then take a piece of your ribbon and wrap it loosly around your waist.. add about a foot extra material to each end then cut the end attached to the spool.. After your ribbon is cut you can feed it through the belt loops just like you would a belt.. and after the apron is finished you will use this ribbon to tie it around your waist.
Next you add colors, textures, deisgns & patterns from things such as patches, ribbons, glitter or fabric paint!Be as creative as you like.. add your name to your apron or a saying like "Domestic Diva" or "Sugar N Spice." You could even hot glue/stitch some lace on the inside tops of the pockets..Possibilities are unlimited!
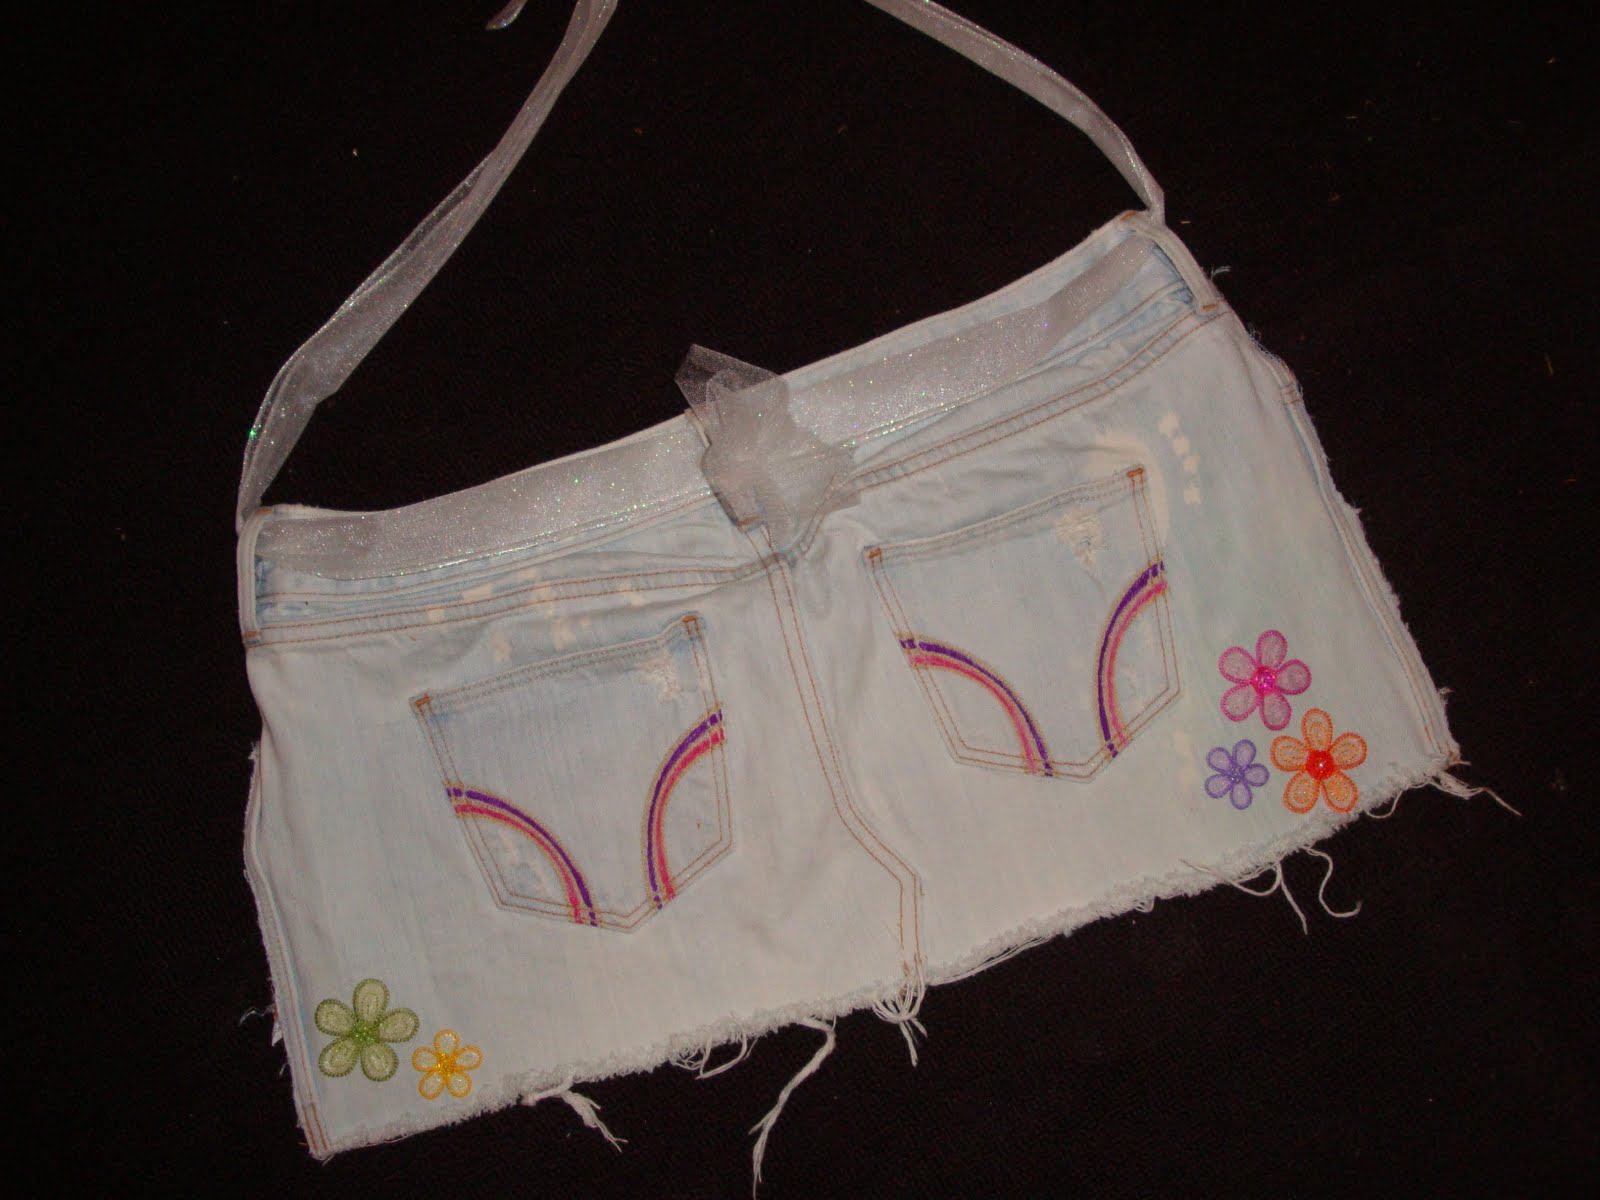
And there ya go!! Great for painting, cooking or even a hair stylist!!!


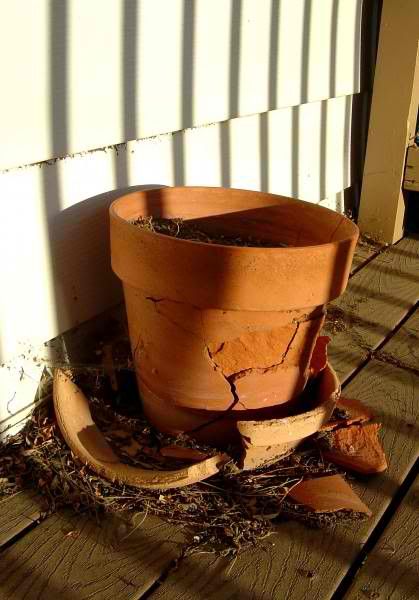
{Broken Terracotta Pots}
Have a few of these unattractive pots laying around your yard? No worries! I'll show you a few creative ways to revamp them with little or no cost depending on your style and what items you all ready have in your home...
Bringing a Terracotta Pot Back to Life:
Instructions..
First gather your broken pots and pieces, wash them with warm soap and water (i used a strainer to help rinse the smaller pieces all together) and then let them dry out on an old towel in the sun or even speed the process with a hair dryer.. It is important that the terracotta is fully dry and clean or the glue will not stick to the pot.
Next, study your crack or chip and really use your imagination to come up with a way to incorporate it in your design. Notice the shape and outline of the crack or chips and try to compare it to other images you like. My chip was an unusual round shape and i thought it would go nicely as the center of a flower..
Next add paint, glue pieces, attach ribbon..the possibilities are unlimited.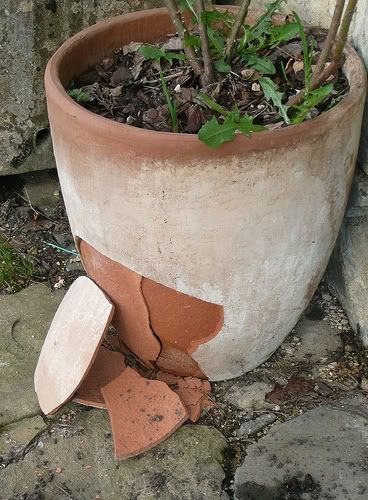 This chip would make me think of a tea cup :) You could outline it with paint and add a handle.. maybe some painted flowers around it. Or even glue on some rhinestones as a border on the cup. Be as creative and unique as you can. The fun thing about this project is that none of your friends or neighbors will have the same flower pot.
I used my broken pieces from the other larger pot and picked out pieces that resembled flower petals.. I painted them, let them dry and then used a hot glue gun to attach them to the pot.
This chip could be a road? You could paint a sunset in the background with trees going from bigger to smaller up the side? It could create a nice home for critters rather than planting flowers in it.

Some more Ideas..
 You can also just completly cover the crack with something like this.
You can also use the extra chipped pieces to make garden markers!

Here is my finished terracotta pot!

Instructions-
For this DIY I am going to be painting my old mailbox and adding flowers planted inside that will flow out of the box and hang towards the ground.
First, what you need to do is fully clean your old maillbox..remove any stuck on numbers or letters and make sure you're surface is dry.

My finished box :)

Once you get the mailbox designed how you like, all you have to do is place it where ever you would like it to shine! I attached mine to a small poll along my deck :)

There are many different things you can do with a used mailbox..maybe try one of these ideas?
Use in the flower garden as a planter
- Store Gardening tools in it
- Make it a birdhouse
- Use as a vase with artificial flowers inside your home
- Use as a mail holder in office
- Set it by your front door as an unbrella holder


I hope you have enjoyed this idea and are now inspire to create you own. Feel free to email me pictures of your work and I will post them here.


