{Casual Candles}

0
COMMENTS

I've decided to write my posts a little differently from now on.. Rather than make you click onto another page to view my DIYs I am just going to spill on post by post. Here we go...

Let me start by expressing my extreme frustration with candles that not only burn too quickly but waste so much wax.. my fix? Recycle that wax! It's not as {crazy} as it seems.. Check it out!!

Supplies needed-
Oil Warmer
Candle Wicks
Scented Candle Liquid
Glass Containers
Combs
& An Old Spoon


 Dig that baby out with a spoon!!!!
 And then put all of that mess into one of these sweet little oil warmers.. You can get them at a lot of different department store for around $10, Walmart has them in stores but not online..
Now let it all melt.. and dont worry about different candle wax colors, thats what makes the candles so pretty...
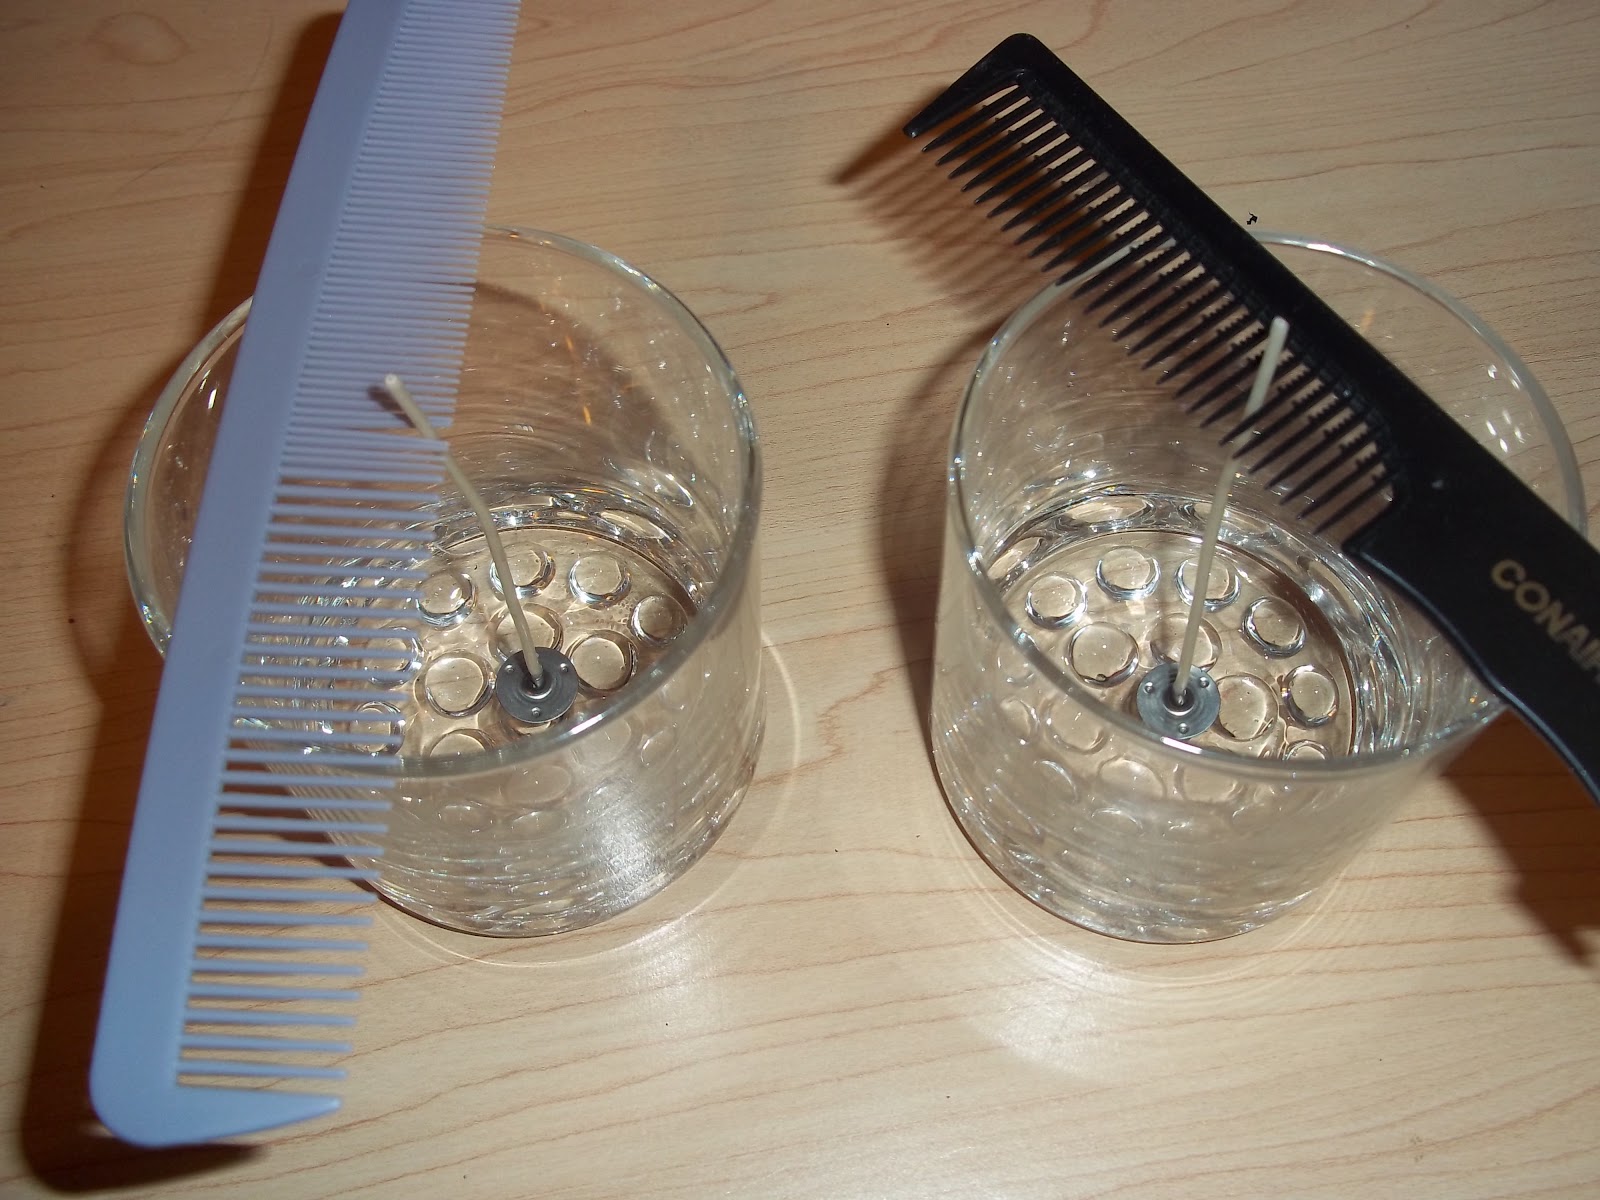
 While your wax is melting you are going to want to get your containers ready. I pick up a lot of my glass wear at Goodwill or yard sales, just make sure when you go to Hobby Lobby to pick up your candle wicks that you get a length to stick out above your container.
I dip the bottom of my wicks into the melted wax to help keep them in place along with using combs to keep them upright.
 
Don't forget to add the scent of your choice to the wax before you pour it. Since the oil warmers are so small I do my wax in batches and thats what gives me the different candle colors.
 

 You pour, let it cool, and add a bow! Ta-Da!!!!
Any questions just ask!


What's for dinner tonight?

0
COMMENTS
So, normally I do not post about food, but this blog was in fact created for the sole purpose of inspiring others so I am going to share what I made one day last week for dinner... These are all new (to me) recipes! Sometimes I get inspired to try something new and maybe this will inspire you too! I love, I mean LOVE www.supercook.com, it is an amazing site that allows you to add ingrdients you have on hand and it pops up all kinds of recipes for you to try! That is where these came from but I will post the direct link to each for you :)

So first I wanted to try Minute Steaks with Barbeque Butter Sauce !
I was never really "taught" how to cook so this was a SWEET new concept for cooking steak! I never was able to get it cooked just how I like it and this whole concept was great, except it does make a bit of a mess on the oven top! But wow did it taste good!
These I LOVED! I didnt have almond slices so I coated them with the mixture and threw them in the oven to roast a bit.. They turned out great and I put the extra sauce in with the beans.. Oh I also didnt have fresh green beans but they still tasted great!
I was not a fan of this really at all.. the texture was nice but I just dont feel like it had much flavor. My husband loved it though so I may make it again some time.. I was half tempted to throw it in the over and try to make it lol
With Roasted Apples for dessert!
I used green apples and I think they turned out nicely!

So here you have it, a great new meal for you to try! Enjoy!

Creative Thinking #2

0
COMMENTS
{Creative Thinking #2}

Tired of foggy mirrors in the bathroom? Grab a bottle of Rain X Anti-fog and mist your mirrors, all the fog shall be gone!!

Simple Yet Swanky!

0
COMMENTS


Simple Yet Swanky

So first let me start by apologizing for my lack of posts lately!! Ah! Sorry!! My photography business had picked up since the start of the year and that with a lot of other things has kept me very busy! So here we are.. a sweet little simple yet swanky way to make one of those vintage looking cocktail hats.. What is a cocktail hat you ask?? Cocktail hats are small, extravagant hats for women. They are usually worn as evening wear and are intended as a alternative to the large brimmed women's hats. These hats are often decorated with beads, jewels and/or feathers. Veils are also a common feature of cocktail hats. ...Why would you or i want to make one? Well i needed one for a friends photography class assignment.. and you might want to make one for a tea party or maybe for a little girl to play dress up.. or maybe just because.. anyway, here is how it is done...

Things you will need-

A straw hat (Goodwill is a great place to find one)
Some Scissors
An onion sack/bag or any other kind of mess type sack
Some paint
and a glue gun

I first started by removing the embellishments off of the hat, if you have any and they go with your design feel free to leave them. I needed a plain hat though :/

Then I cut all around the brim of the hat making sure not to cut into the sew edge of the top piece so it would stay together..


Next I cut one end of the onion sack open and then glued the tied end to the inside center of the hat.. if this seems confusing sorry, just take a few minutes to think about it and you will figure it out..

After the glue has dried you are ready to paint.. choose any color you like just make sure you get a flat paint because i had a ton of problems with the satin.. Also, to make it easier to paint i put my hand in a walmart sack and then placed the hat over it so i would avoid overspray but still be able to freely turn the hat to get coverage from all angles.

Let your paint dry, add a few more coats if needed, and there you have it.. a cute little cocktail hat :)

Creative Thinking #1

0
COMMENTS
I've decided to do a new little thing called Creative Thinking.. this is going to be my way to blog on the go between my regular posts. Each post will contain a short and sweet tip, idea or concept which will basically be all the random things i do here and there in my little world.. so lets try this.....
{Creative Thinking #1}
Grab a bag of scented pine cones (i got mine at Walmart for half off today on an end of season sale) and place one in all of the floor vents in your house. I used the larger ones out of the bag and they rested on the sides of the vent..each time the heat kicks on you get a nice burst of the scent all around the house and it keeps the "holiday" pine cones out of sight. Cheap & easy!!! ;)

A Clothesline INSIDE?!?!

0
COMMENTS

Yeah, thats right!! Here is the story..I switched rooms with my daughter, and have not yet had the chance to paint this new room i use as my office/studio.. so, I tried to think of some quick, easy & cheap ways to brighten up my walls until I can paint this summer.. I have always been a huge fan of picture collages, keeping sentimental things like movie tickets, and also organized mess! So, here is what I came up with!! Click here for easy steps into the clothesline madness!!

Update on Life..

0
COMMENTS
So I have recently been very busy helping my dear friend Amanda with her photography class homework!! :) It has been a blast but doesnt leave much time for DIYs or blogging!! But I am not complaining.. Modeling is FUN! lol Anyway, I asked her to take some family pictures for us so I figured I would share a few of those and some of the other photos we shot.. Here ya go!


Oh, some more big news!! I got my Christmas present early!!! It's a fancy Asus Eee Pad Transformer.. I have yet to blog with it but I plan on doing so soon!! :) It is lovely!!


I ♥ Maurices!!!

0
COMMENTS
Well, I've shared a few DIY projects, let you peek at my photography, spilled a little of my soul in some poetry & published previews of my home.. Now I think it is time for a little of my personal style! Agree? Good! No? Oh well here I go!

I had a mini shopping spree at my ALL TIME FAVORITE STORE EVER, Maurices. I got a ToN of stuff and spent a little over $200, now keep in mind not all of my purchases are listed below..and I snuck a few items in from a trip a while back. Enjoy...


PhotobucketPhotobucket

PhotobucketPhotobucket

PhotobucketPhotobucket

PhotobucketPhotobucket

PhotobucketPhotobucket


Like what you see? Visit Maurices.com to do a little shopping yourself!!
All Images  ©Maurices 2011

Blank Wall? Why not...

0
COMMENTS

Long story short, we have had a lot of water heater problems in the past.. the access panel is in my daughter's room and as small as it is there were not many options for her bed placement.. and both ways I was able to put the bed blocked the access panel for the water heater.. So.. I switched her rooms! My office for her bedroom.. and then... I came across a blank wall!!
That's when MAGIC HAPPENED! Okay, maybe not magic, but I seen an opportunity and ran with it!! Here are some pics! Enjoy!

The INSPIRATION :)
                                         Her very lovely bedding set that I purchased at Kohl's


       I darkened the image a little to make the color pop :)


The color is off a bit because of the lighting in the room and the color of the wall but you get the just of it :)
Comments Welcome!


Not So Tragic T-Shirts!!!

0
COMMENTS
       Let me start by apologizing for my lack of posting lately! Since my baby girl has started school my schedule has changed and well, I’ve just not had the time. But, after some recent inspiration I am back in the game Woot! Here we go.. So. I recently went out to see a local band called Bad Country (great show might I add, check them out on Facebook!) and there was a waitress wearing the cutest little t-shirt..it had an amazing ripped/stretched/laddered pattern down the back and wow did she rock it! I decided then that I would have to *try* to create my own! I remembered watching an episode of Rock of Love with Bret Michaels where he took his lovely ladies out for a date to a celebrity t-shirt cutter/artist? I guess you would call him? So I headed straight for the ole trusty Google page and did a little research and here is what I came up with! Check out the video of Adam Saaks below, his work is ahhhhmazing...


Now you can Click Here to see my Adam Saaks inspired T-Shirt Reconstruction!

Fun For School!!

0
COMMENTS
My daughter, Kadelyn, started kindergarten this year and the past two weeks they were studying colors. So, each day they had to wear a different color..Well, some of those colors we did not have in her wardrobe so I decided to do a fun little project that would be hands on and safe for her to do!! So here we go!!!

This isnt a DIY project, just something fun for us to do but feel free to try it yourself with your kids! All we needed were some bowsl, food coloring, vinegar, rubber bands and some plain white t's :)


All we did was tie up the shirts in different ways using the rubber bands, added vinegar to the food coloring and then we dipped, dabbed, dripped and dropped color all over them.


After we finished with our designs we let them dry for the night, and the next day we rinsed them in cold water. I read that adding salt to the water helps keep the color, but I am not sure if that actually helped or not??

They turned out really well.. some of the color does fade after washing but it is still a nice project with the kids!! :)

Bored with you Board?

1
COMMENT
So as I sit at my desk daily.. I like to have some inspirational items to look at.. Pictures, Quotes, Cards Etc.. Well, I’ve decided that with my new office, I will be needing a new inspiration board.. which i think i have decided to make now, an inspiration WALL! Like this -------------------------->

But, that DIY will come later.. For now, what am I going to do with my old cork board? Hmmmmm...I think it needs a new function. A makeover should do the trick! Click here to see!!!